Azar Sayan Print Guide
Different Methods Of Printing
Transferring a pattern onto an object is achieved by different methods which distinguishes the printing methods from each other. Also, plate differences can cause different printing methods. (Except digital printing which its main difference is not having plate.)
Screen Printing
The most popular type of plate which is popular because of easy preparation of screen is screen printing. The screen is made of net which by blocking some holes; the ink is transferred from the open holes onto the object to make the pattern.
Gravure Printing
It was the main paper printing method, and modern print paper started with this type of printing. We all, sometimes, print using the same method. Whenever you fingerprint a piece of paper for identification purposes, in fact you are using gravure printing. Our fingers are used as print plate. In this method, the object is engraved to form a pattern; ink from the surface is then transferred to the object. Stamping paper is also another example.
Intaglio; transferring ink from the engraved surface
Normally, copper or zinc plates are used as a surface, and the incisions are created by etching, engraving, drypoint, aquatint or mezzotint. Collographs may also be printed as intaglio plates. To print an intaglio plate, ink is applied to the surface and then rubbed with tarlatan cloth to remove most of the excess. The final smooth wipe is often done with newspaper or old public phone book pages, leaving ink only in the incisions. A damp piece of paper is placed on top and the plate and paper are run through a printing press that, through pressure, transfers the ink from the recesses of the plate to the paper.
Digital Printing
Currently, we are using this method in many homes and offices as small printing machines for small quantities of papers. The plate is omitted in this method; and microprocessor system transfers the photo on the paper dot by dot.
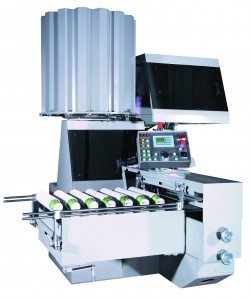
Making Better Use of Cup Printer Model DO-7
The N-DO-6 model has been designed to be operated automatically by one operator, printing with 20,000 cph, and high quality, meanwhile the plates and mandrels are changed rapidly. Additionally, feeds and prints short cups with no problem.
By reading the following article, you will be guided to reach the above aims:
Point 1: Increasing the length of re-stacker’s table
The minimum length of re-stacker table has been considered for this machine; because the space that this machine occupies is unknown, but if you have big space you can add a metal sheet to its length and expand it four times. This way the operator finds extra time for bringing cartons, filling the cup bank, etc. That’s why we have not closed the re-stacker’s end.
Point 2: Increasing the height of cells of cups bank
The same situation goes for the cups bank as well. That is if the height of ceiling allows, you can increase the height up to 3 times. This way the capacity of cups bank increases to 6,000 and the operator will need to fill the bank every 20 minutes with 20,000 prints per hour.
Point 3: Quick change of plate
Plate cylinders have been designed in a way that is dismounted rapidly by only 3 screws. If you would have extra set of plate cylinder, you will be able replace them and the design will machine in operation. By turning the machine for some minutes, you can start the next print. For un/screwing the screws you will need to have pneumatic screw driver.
Point 4: Cleaning the plate
Unscrewing 6 screws, the plate and its cylinder will be dismounted from the machine. Then you can wash them by brush in a container. Be careful not to harm the fixing pins on the cylinder. Following this method prevents you from wasting time and energy.
Point 5: Some guidelines about printing on light cups
Well- and precisely-made mandrels are quite important in high speed print. Sometimes the cup is so much light that cannot be discharged from the mandrel after printing; so it returns again for printing and causes the machine stop. If your cups are like this, the solution is as the following: There is an air push station on ejection unit which helps the light cups to be discharged from mandrels. Of course, you need to first send the air to this station. This option ensures printing light cups without repeatedly returning the cup inside the machine. It also, cools the mandrels down to avoid the light cups from melting on mandrel.
Preparing Cups Before Printing
Most plastics cups, such as polyethylene, polypropylene and PVC, have chemically inert and nonporous surfaces with low surface tensions causing them to be non-receptive to bonding with printing inks, coatings, and adhesives. Although results are invisible to the naked eye, surface treating modifies surfaces to improve adhesion. Corona treater is responsible for this task in offset cup printers.
Peacock Color Picker
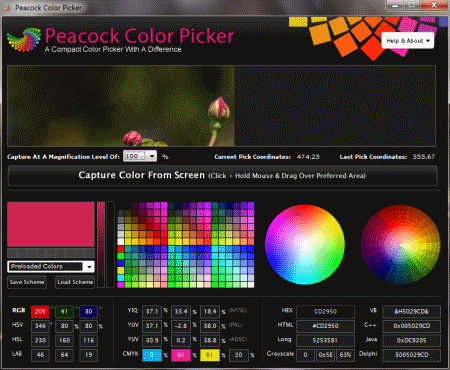
Peacock Color Picker is a free software that lets you get the color of any pixel on your screen. You can capture your screen color by clicking and holding your mouse on Capture Color From Screen button and dragging your mouse to the desired location. When you release the mouse button, it captures the exact pixel color for you. You can save it as a color scheme. It shows the value of that color in RGB, HEX, HTML, VB, C++ and in many other formats as these values are required by graphic designers and web designers.
Download HereUV dryer
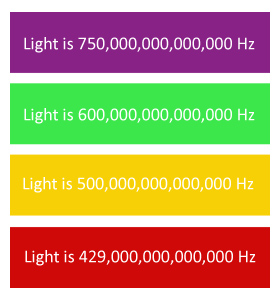
UV (Ultra Violet) is invisible light. Human eyes are able to see only parts of the light spectrum, as the ear is able to hear some sound frequencies. Human eyes are able to identify light with 750,000,000,000,000 to 429,000,000,000,000 of frequencies. Human ears are able to hear 20 to 20,000 cycles per second. Listen to 150 cycles per second
Light
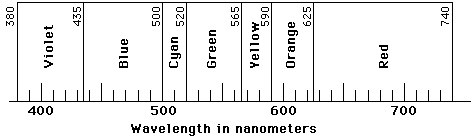
Each color is in fact a light which our eyes distinguish. cycles per second is referred to as Hertz (Hz). The hertz (symbol Hz) is the SI unit of frequency defined as the number of cycles per second of a periodic phenomenon. However, for the light, it is referred to as wavelength.
Light has been divided into 3 types:
1.Ultraviolet (UV)
2.Visible light which is visible to human eye
3.Infrared (IR)
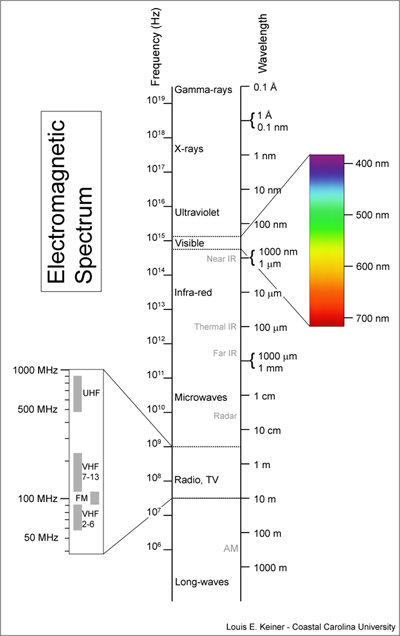
Changing the light frequencies, results in changing its effectiveness and features. An object being exposed to the infrared light will get warm. It is used in physiotherapy as well for warming the body joints. Infrared light can transfer heat to the body. When ink is being called as IR, it means that it gets dried by heat. If this heat would be supplied by getting exposed to the IR light, the ink will be dried faster and better. If you feel hot in front of fireplace, it is because of the infrared light; however, if you feel warm by putting our hand on the heat, it is because of hot air transferred to your hand. So, there would be different between air dryer and infrared one.
However, Ultra Violet light has its own effects. For example, your body gets tan because of the UV in the sunlight. The harm to your eyes is caused by exposure to UV radiation from Argon electro arc welding. When talking about UV ink, we mean that it gets dry by exposure to UV light. UV ink is converted from liquid to solid in a fraction of second. The increasing causes of its usage are as following:
1.Very fast drying has caused the UV dryers to be smaller
2.IR inks made a lot of problems because of unwanted drying. Using UV inks solves the problem.
3. UV ink will not get dried until exposing to the UV light. UV dryer consumes less power than IR dryer.
Dangers of UV Light
The main danger is exposure of UV rays to human eye. Symptoms include increased tears and a feeling of pain, likened to having sand in the eyes. Symptoms tend to occur a number of hours after exposure, and typically resolve spontaneously within 36 hours, although constriction of the pupils may last as long as 96 to 128 hours in some cases. The injury may be prevented by wearing eye protection that blocks most of the ultraviolet radiation, such as welding goggles with the proper filters, a welder’s helmet, sunglasses rated for sufficient UV protection, or appropriate snow goggles. The condition is usually managed by removal from the source of ultraviolet, covering the corneas, and administration of pain relief. The second danger is conversion of Oxygen to Ozone which is a poisonous gas. Ozone is sometimes used for sterilization. All machinery have a gas vacuuming system for removing Ozone which needs to be checked from time to time to ensure that all the way to out is not closed. Of course, ozone is converted to oxygen after a short time.
Techniqes of Artwork Design For Cup Printer Plate
In order to have a good artwork for your cups, a graphic designer needs to notice the following points:
1.If your design contains barcodes, it should be vertical. It means that you’re the bars should be printed horizontal on the cup; because the barcode scanner is conical not flat, it will be helpful to read the barcode.
2.Try to put texts with small type face at the middle of the design. Since all such machines consider the conical cups as cylindrical ones, they add slight tram shadows on top and bottom of the cups. One reason that the barcodes should be printed horizontally is that vertical bars become wider at the top and bottom; the more the taper of the cup, the wider are the bars. Therefore, if you want a good print, you should put your important elements in the middle of the artwork.
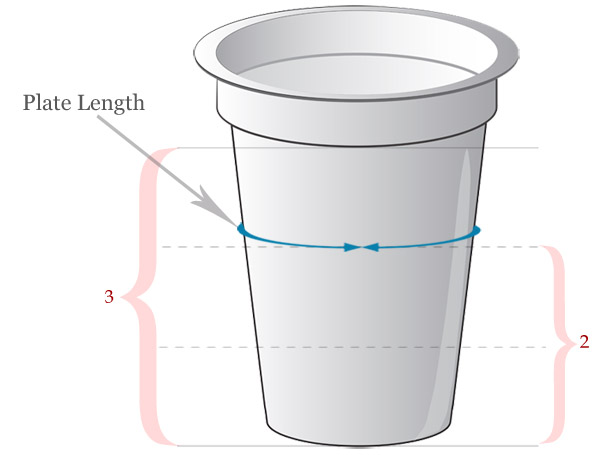
3.For calculating width of the plate, calculate the circumference of two third of the cup from the bottom as shown on the below image.
4.If it is supposed to print entire length of cup and 2 prints ends meet each other, the graphic designer needs to design the artwork in a way that if you cut 5 mm from the ends, it would not be affected that much. In this case, noticing ink overlap from the ends, the operator can solve this problem with cutting the rubber blanket.
5.For designing the artwork, the graphic designer needs to have the dimensions of the plate. The dimensions are provided in a drawing from the machine manufacturer.

Artwork Design for Printing with Dry Offset Printer
To have a beautiful print, hiring a professional graphic designer is a MUST to start the design. A print without a valuable design leads to spoiling of others’ efforts. A central feature of dry offset printers is using CMYK colors. A good graphic designer, who knows such machines well, will be capable of delivering good artwork.
The main difference is that these machines have ink-mixture limitation. In order for printing green color in offset paper printers, blue and yellow dots are printed beside each other and you see them in green. By putting the four small colored dots, CYAN, MAGENTA, YELLOW, and KEY (black), beside each other all the colors are printed on the artwork. You can see the dots easily by a magnifier. However, in offset printers, the graphic designer should consider the number of machine’s colors to design accordingly. For example, if your machine is a five color printer, your artwork needs to contain at most five colors, which each ink unit needs to print each color separately.
What is the problem of color combination?
In these machines, the inks are transferred respectively on a medium rubber, and then printed on the object. But if the colors overlap, you will experience ink contamination. If a part of a black and yellow color overlap, the yellow print will be contaminated with black. That’s why you will never be able print green by overlapping yellow and blue. This problem does not occur in paper cup printers because the colors are not transferred simultaneously but respectively; so transferring color from a plate to another is impossible.
Techniques of making color combination in dry offset machines
The points that an operator needs to consider about color combination is that darker colors should be used in the last ink units. Additionally, price ink adjustments should be done to result in the least overlap. These are the only techniques that the operator should use; the rest depends on the art of graphic designer.
First Technique: Less yellow use
A general point that a graphic designer needs to know about is using as less yellow color as possible in the parts that has color combination as yellow is the most vulnerable color in color contamination comparing to the other ones.
Second Technique: Using pure yellow
If you have to use yellow trams on the other colors, try to use yellow alone in other parts as much as possible.
Suppose that yellow ink unit has two ink input and one ink output. It means that while the ink unit takes ink from the ink fountain, the plate is also colored because of its contact with the ink from blanket and blanket then transfers the ink to the form rollers as well. Now if we try to increase the amount of input pure yellow ink to be more than other unwanted inks transferred from blanket to form roller, there would be less contamination.
Third technique: Overlapping of similar colors with no problem
You can use two dark and light green colors as your background so that the colors overlap each other as trams when reaching from both sides; it will make gradient overlay background from dark green to light green. This technique is the same in similar colors. Because of the similarity of the colors the effect of color contamination reaches to the minimum and can be ignored.

Fourth Technique: Black dots on other colors
Contrary to yellow, black is barely contaminated. So, you can systematically add black dots on other color patterns to make beautiful images. I have seen a fantastic photo of a strawberry made of red and black color.
However, you should try using lesser black than red in this method as well. Why? Operator fills the first ink unit with red and the last one with black. It means that the blanket takes the red ink first and then contacts black. If the black ink on the plate contacts with the red color on the rubber blanket, black will be less affected because of its higher saturation. But you need to be cautious about yellow, because the blanket, contacting the printing piece, does not transfer whole the ink and then in next turn it will be blackish and if contacts with yellow, will contaminate it.
Using the above techniques, a graphic designer and machine operator will be able to make beautiful print on your products.
Drawing of Mandrels for Cup Printers
The followings are the drawing of different sizes of mandrels being used in the dry offset cup printers. Click on each image to see the larger file.
Also, you can download the .dxf AutoCAD (Drawing Interchange) format by clicking the below download button.
Download HereFundamental Points for a good print result
Without any knowledge about the machine setting, achieving a good print demands a miracle. Would you need a print without miracle aid, read the following post.
One of the most important instruments for adjusting and controlling a printing machine which is a MUST for any printing house is Dial Indicator which is used for checking different parts of machine involving in printing. Each time the mandrels are changed in tube or cup printer and etc. they must be checked by the dial indicator which is available everywhere with reasonable price.
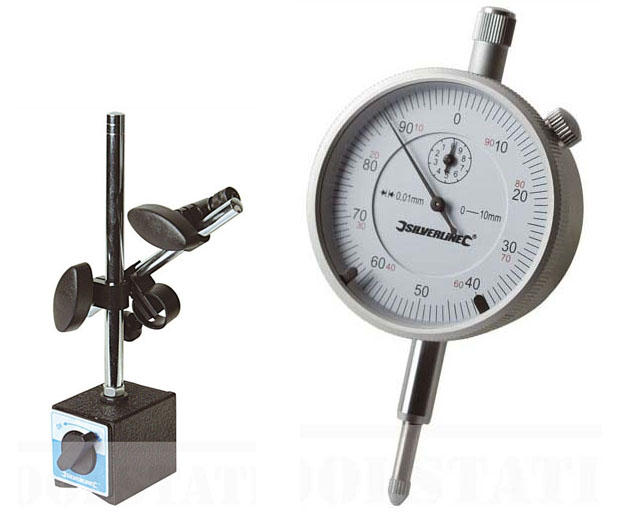
While using the device, try not to fasten it too tight to the magnetic stand; it may result in serious damage to it. Dial indicator is a measurement instrument which measures precise unit as 0/01mm. How thick is 0/01mm you ask? Well, compare it with a single human hair of human which is about 0/05mm. So it can measure things as thin as one-fifth of a hair.
In cup printers, it is used for the recognition of:
1.Differences between mandrels as they to be exactly the same.
2.Deflection of the mandrels
3.Deflections of indexing axis
4.Deflections of plate cylinder
5.Deflections of drum
Testing point 1 and 2 is necessary every time you replace the mandrels. The rest should be tested at least every two months.
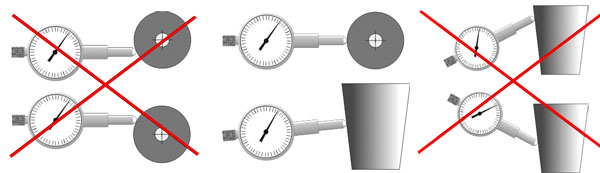
How to use a dial indicator
The magnetic stand of the dial indicator has strong magnet which sticks to ta fixed part of a machine in order to check the axes by spending some short minutes for working with the device will let you handle and master the base. The most important point in using the indicator is it needs to be perpendicular to the axes.
When to use dial indicator when encountering problem with a cup printer
1.One of the 8 cups on the indexer is not printed or has a print ghost
2.Some parts of the cup has not been printed or has a print ghost
Solutions:
In the above cases, you must use the dial indicator. However, unfortunately, in the workshops in the workshops with poor technical knowledge, the problem is solved by increasing the pressure of drum which damages the cylinder.
Gently, turn the mandrel by your hand one complete round. The desirable result is no more than 0/05mm. The lower the number is the better. If the deflection is more than 0/05mm, some parts will remain unprinted. Apply the above test for the rest of the mandrels.
Cup Printer Plate
The plate of dry offset printers is composed of different parts:
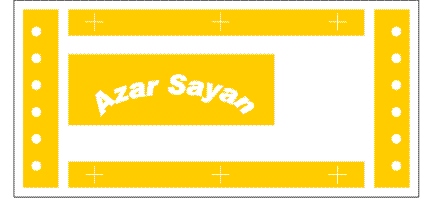
Right And Left Sidebar Hoes: The holes are used for stretching the plate on the cylinder. They are also used to help better plate punch.
Print Area: The area marked as “AZAR SAYAN” is called print area. Your artwork for getting printed is placed here. The size of the plate is different for every printing machinery.
Top and Bottom Bars: The bars are used for adjusting the last rollers which transfers ink to the plate. With approaching the roller to the plate and seeing each ink on each bar, the operator recognizes the deflection of the roller to the cylinder plate and consequently adjusts it. The more the distance between the bars, the precise are the adjustments; however, if you are certain about your machine, you can eliminate the bars to reduce the costs, although usually they are not eliminated.
Plus (+) Signs on the Upper and Lower Bars: These signs are indicators for ink registration so that each color is printed on its right place. It is extremely important that each ink has the same position to the (+) sign. If not, it will be impossible to register colors with color registration device later.